How to automate manually process from different websites, crm & dsahbaords. Every day with username and password to web dashboard of companies we manage online campaigns for them.
Some of the dashbaord should be access with Selenium, some have API. etc After login, export a simple report, in excel/csv format.
Need to prepare the data, and push it back to CRM via our simple API request.
All settings correct for using Composer
Downloading...

Composer (version 1.6.5) successfully installed to: /usr/local/bin/composer
Use it: php /usr/local/bin/composer
3. Once the installer finishes, verify the installation:
composer --version
The system should output the version number installed, for example:
Composer version 1.8.6 2019-6-11 15:03:05
4. To remove the installer:
php -r “unlink(‘composer-setup.php’);”
Basic Composer Usage
Composer is designed to track dependencies on a per-project basis. This makes it easier for other users to create the same environment. Composer uses acomposer.jsonfile to keep track of required software and allowed versions.
It also uses a composer.lockfile to maintain consistency if someone copies the directory. These files are automatically generated using therequire command.
1. Open a terminal, and enter the following:
mkdir c_sample
cd c_sample
2. Next, you’ll need to choose a package to load. The websitepackagist.orghas a broad range of different PHP packages for download. In this example, let’s use themonolog/monologpackage. You can follow the instructions, or search the website for monolog.
3. In the terminal window, enter:
composer require monolog/monolog
The system will download the software and create thecomposer.json and composer.lock files.
Note:Monolog is a package for managinglogfiles. The name before the slash is the vendor, and the name after the slash is the package name.
4. Once the process completes, list the contents of the directory:
ls -l
You should see the composer.json and composer.lock files, along with a vendordirectory.
5. To view the contents of thecomposer.json file:
cat composer.json
The system will show you that it has added the monolog software. The carat^sign beside the version number indicates the minimum version of the software.
Setting Up Autoloading
PHP doesn’t automatically load classes. However, you can configure Composer to autoload classes for you. This makes working with dependencies much easier.
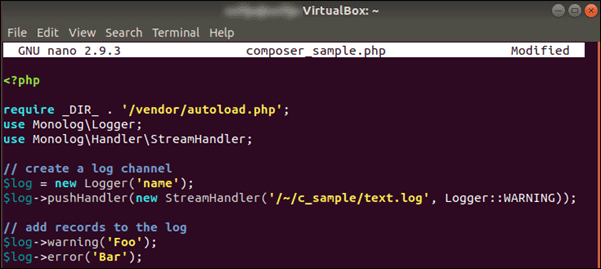
1. Create a new file using your favorite text editor:
sudo nano composer_sample.php
2. Enter the following into the file:
<?php

require __DIR__ . '/vendor/autoload.php';

use Monolog\Logger;

use Monolog\Handler\StreamHandler;


// create a log channel

$log = new Logger('name');

$log->pushHandler(new StreamHandler('/~/c_sample/text.log', Logger::WARNING));


// add records to the log

$log->warning('Foo');

$log->error('Bar');
3. Write the file (Ctrl+O), and exit (Ctrl+X).
4. Now you can run the command toautoload monolog:
php composer_sample.php
Updating Dependencies
To update all the dependencies in yourcomposer.jsonfile enter the command:
composer update
This will update all dependencies according to the version specified in the file.
To update one (or more) dependencies individually:
composer update vendor/package vendor_b/package_b
Conclusion
Now you have a good understanding of how to install and start using PHP Composer. We also covered setting up autoloading and updating dependencies.
Before installing Virtualmin, now we install Webmin because Webmin uses a plugin called Virtualmin to simplify the management of multiple virtual hosts through a single interface, similar to cPanel or Plesk.
Now install Webmin using the official repository on both Debian and non-Debian-based systems. We can install Webmin using the Webmin APT repository on Ubuntu as shown below:
sudo nano /etc/apt/sources.list
# Add these lines at last
deb http://download.webmin.com/download/repository sarge contrib
deb http://webmin.mirror.somersettechsolutions.co.uk/repository sarge contrib

# Save and exit the editor
Next, install the GPG key as shown below. We need the GPG key to trust the repository:
Now we can install the most recent version of Webmin using the following commands:
sudo apt update
sudo apt install webmin
Step 3. Configure Firewall.
By default, Webmin listens for connections on port 10000 on all network interfaces. You need to open the port in your firewall so that the Webmin interface is accessible from the Internet:
sudo ufw allow 10000
sudo ufw reload
Step 4. Accessing Webmin Web Interface.
To login to Webmin’s dashboard, open up your browser and browse your server’s IP as follows:
https://your-server-ip-address:10000/
Step 5. Installing Virtualmin on Ubuntu 20.04.
Virtualmin provides an install script that allows for an easy installation. Run the commands below to download the Virtualmin script:
Finally, run the commands below to install Virtualmin:
sudo ./install.sh
The script will display a warning message about existing data and compatible operating systems. Press y to confirm that you want to continue the installation.
Step 6. Accessing Virtualmin Web Interface.
Virtualmin web-based monitoring will be available on HTTPS port 10000 by default. Open your favorite browser and navigate to http://your-domain.com:10000 or http://server-ip-address:10000.
Congratulations! You have successfully installed Virtualmin. Thanks for using this tutorial for installing the Virtualmin on your Ubuntu 20.04 LTS Focal Fossa system.
Lastly, see the information on [configuring the second PHP version](#toc-configuring-the-second-php-version-in-virtualmin-ooq1ksVU “configuring the second PHP version”) below.
## Installing PHP version 5.6 and/or 7.3 and/or 8.0 on Ubuntu 16.04, 18.04 and 20.04
Lastly, see the information on [configuring the second PHP version](#toc-configuring-the-second-php-version-in-virtualmin-ooq1ksVU “configuring the second PHP version”) below.
## Configuring the second PHP Version in Virtualmin
Once you have completed the installation of a second PHP version on your server, you can verify that Virtualmin sees it by logging into Virtualmin, and clicking System Settings -> Re-Check Config. You should see something like this:
The following PHP versions are available : 5.3.3 (/usr/bin/php-cgi), 5.6.25 (/opt/rh/rh-php56/root/usr/bin/php-cgi), 7.0.10 (/opt/rh/rh-php70/root/usr/bin/php-cgi)
You can configure which one is the default PHP version used on new Virtual Servers. The default is to use the newest available. You can change that default in System Settings -> Server Templates -> Default -> PHP Options, and on that screen you can set the default PHP version to use in the field **Default PHP version**.
## Configuring Individual Virtual Servers
You can configure the PHP version being used for a specific Virtual Server by selecting Server Configuration -> PHP Versions.
The first line there specifies what PHP version will be used by default.
If you wish, you can specify a different PHP version to be used for a specific directory.
If you have multiple PHP versions installed, Virtualmin allows you to choose which version to use for a given domain, or even per-directory.
While this feature can work with any Linux distribution, it works best with 64 bit [CentOS (6 and above)](#toc-installing-php-72-on-centos-6-and-7-yTjimn_w “CentOS (6 and above)”) using the CentOS Software Collections repository, or on [Debian 10](#toc-installing-php-56-70-71-72-73-on-debian-10-buster-EkAj9qSJ “Debian 10”) using a PPA, or on [Ubuntu 14.04](#toc-configuring-the-second-php-version-in-virtualmin-ooq1ksVU “Ubuntu 14.04”) using a PPA.
Installing PHP 7.3 on CentOS 6 and 7
Notes about CentOS
CentOS has a special repository called “Software Collections”, which is a system for installing multiple software versions on one server. Using packages provided by in the Software Collections repository, it’s possible to install more recent PHP versions /opt/, while keeping the default PHP version installed in /usr/.
The repository providing these packages currently only provides 64 bit packages. If you are using 32 bit CentOS, there are unfortunately no PHP packages for that.
Once you have completed the installation of a second PHP version on your server, you can verify that Virtualmin sees it by logging into Virtualmin, and clickingSystem Settings -> Re-Check Config. You should see something like this:
The following PHP versions are available : 5.3.3 (/usr/bin/php-cgi), 5.6.25 (/opt/rh/rh-php56/root/usr/bin/php-cgi), 7.0.10 (/opt/rh/rh-php70/root/usr/bin/php-cgi)
You can configure which one is the default PHP version used on new Virtual Servers. The default is to use the newest available. You can change that default inSystem Settings -> Server Templates -> Default -> PHP Options, and on that screen you can set the default PHP version to use in the fieldDefault PHP version.
Configuring Individual Virtual Servers
You can configure the PHP version being used for a specific Virtual Server by selectingServer Configuration -> PHP Options.
The first line there specifies what PHP version will be used by default.
If you wish, you can specify a different PHP version to be used for a specific directory.
Сигнал – <екшън прайс сигнал - пин бар, фейки или каквото друго добавим>
Параметри на сделката:
Вход:<стойност на входа>
SL: <стойност на стоп лос>
TP: <стойност на таргет>
Риск : Възнаграждение = <стойност на R:R>
Забележка 1: Ако изпуснете вход на дадена сделка, може да прочетете тук за алтернативен начин да се влезе – Как се търгуват моите прогнози? Забележка 2: От изключително значение е да търгувате с брокер, който предлага истинска графика тип ‘New York Close Charts‘, (истинска 5-дневна графика, която съвпада с New Zealand Open и New York Close). Можете да свалите демо или да се регистрирате, за да тествате от ТУК Забележка 3:Моите прогнози и анализи не са съвет или препоръка за търговия или инвестиране, а само образователна и обща информация. Не купувайте и продавайте на сляпо пазарите/продуктите, обсъждани в този бюлетин, направете свои собствени проучвания и осъзнавайте рисковете и възнагражденията. Забележка 4:Всички графики са на ДНЕВНА времева рамка, освен, ако изрично не съм посочил, че е друго.
Hello,
I need a tool to create from Excel file multiple CSV files. My first thought is to have it done through Macro (VBA). I am trying to describe the structure dynamically, so the macro could be reused for similar projects, but if this will bring up the costs, I will have to go for the “quick and dirty” solution.
So the goal of the project is defined, “how to” deliver is still open, we can discuss.
I am looking for someone who can deliver rather quickly – lets say 1-2 weeks max (for production version).
Everything is described in the attached Word file. In the file, there are 3 inserted XLS files (objects) – please make sure to review them as well.
This is a very simple project.
I need this done quickly after being hired.
Ignore the $999 budget and bid what you believe is fair.
Open the attached workbook.
This is a simple Excel-based CRM.
New leads are loaded in the “new” tab.
The current database of leads is in the “main” tab.
The user will place new leads in the “new” tab and we need a script/macro that will move the new leads from the “new” tab into the “main” tab.
However, we do NOT want duplicates added.
Your script will clean up all the URLs (column A) from the “new” tab and remove the “www.” so we are left with the rest of the domain name (e.g.: “www.yahoo.com” will be converted to “yahoo.com”).
Next your script will compare the URLs against the company names (column A) in the “main” tab.
If there are duplicates these rows will be ignored.
The remainder URLs will be appended to the “main” tab
In the workbook, the “new” tab has two duplicate records (fenixlighting.com and brightguy.com).
Thus the remaining records in the “new” tab (the URL and the phone number) are appended to the “main” tab.
After the append is done, the “new” tab is cleared out (from row 2 and down).